Saturday, December 13, 2014

Editing Arduino sketches with IntelliJ Idea 13.1 and C++ plugin

I started building Arduino backed robot per instructions in http://blog.miguelgrinberg.com/post/building-an-arduino-robot-part-ii-programming-the-arduino and quickly discovered pain of editing the sketches in Arduino IDE. The pain forced me to release C++ plugin 0.8.6 for IntelliJ Idea 13.1, new version is functionally identical to previous version except supports newer version of IntelliJ Idea.

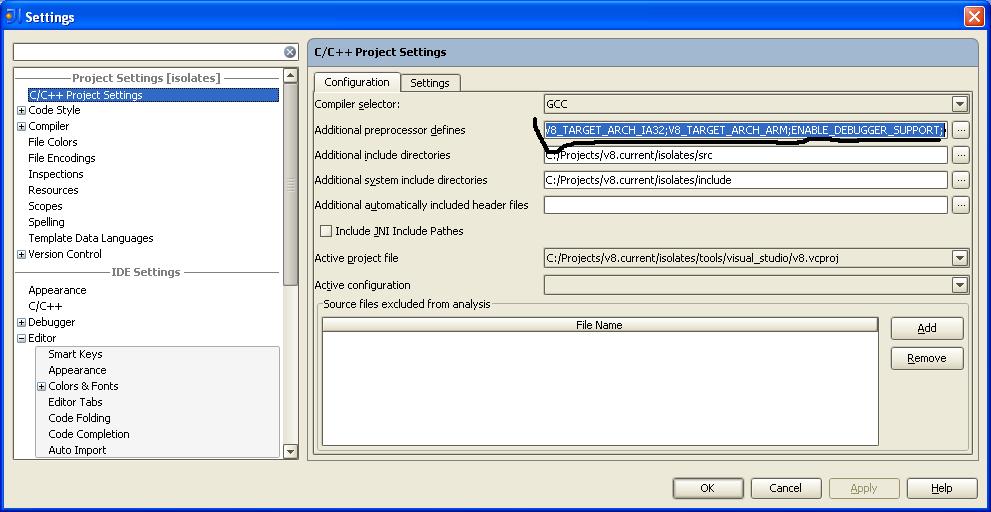
To edit sketches one needs to specify extra include paths from Arduino Ide installation (e.g. %arduinoidepath%/Resources/Java/hardware/arduino/cores/arduino , %arduinoidepath%/Resources/Java/libraries/SoftwareSerial) and add "ino" extension mapped to c/c++ file type. Another needed configuration setting for resolving Arduino built-in symbols (like Serial) is specifying custom file in Additionally automatically included header file of C/C++ project settings. The file (e.g. ArduinoSetup.h) should have following content for auto adding Arduino specific symbols declarations in every file:

#define UBRRH
#include "Platform.h" // Arduino symbols declarations

Once one finishes with sketch editing one can use Arduino IDE to upload the sketch to the device.

Friday, February 8, 2013

C/C++ plugin 0.8.4 for IntelliJ IDEA 12 is available

 C/C++ plugin 0.8.4 for IntelliJ IDEA 12 is available.
This is same vanilla backport of C/C++ plugin 0.8.3 reflecting API changes and dropping support for old IntelliJ IDEA versions. One nano feature is new in this version though: you can configure colors for existing Makefile highlighting.

Sunday, June 27, 2010

How to start hacking V8 JavaScript engine, IntelliJ IDEA Project Configuration

This blog post will describe how to start hacking V8 JavaScript engine with IntelliJ IDEA and C/C++ plugin.

First, one needs to checkout the sources from Subversion. You can do it using IntelliJ IDEA via action located in Version Control | Checkout from Version Control | Subversion. In appeared "Checkout from Subversion" dialog one should add "New repository location" e.g. "http://v8.googlecode.com/svn/branches/experimental/isolates". Choosing repository and pressing "Checkout" will show us "Destination directory dialog", specify target directory and press default buttons in next dialogs.

After checkout IDEA suggests you to open the project for the directory you chose. After accepting this on and pressing default buttons several times one gets IntelliJ IDEA project with V8 sources.

For V8 project additional macros should be defined (e.g. V8_TARGET_ARCH_IA32, ENABLE_DEBUGGER_SUPPORT, etc), it should be done in Settings | C++ project settings (see screenshot below), just separate the macros list with semicolon.


V8 is cross platform project, it contains several implementations of v8::internal::OS, with the same methods. To avoid getting many "duplicated" symbols warnings with C++ plugin one needs to deselect reporting of "Duplicated definitions" warnings in second part of C++ project settings, reference image added below.


If one starts C++ project first time then system wide settings (like where gcc / MS Visual C directory is, system wide defines, etc) should be configured in Settings| C++ IDE settings, see screenshot below for the reference.


In next blog post we will develop some patch for V8, stay tuned :)

Sunday, March 7, 2010

Hacking V8 JavaScript engine

As many of you know, V8 is JavaScript engine for Chrome.
As every V8 embedder knows, V8 engine can not have several instances in process, or, more specifically, there could be no more than one JavaScript execution thread in the process in every moment of the time. With wider use of JavaScript as serverside language, the V8 limitation (fine for process per tab browser scenario) seems to be unfortunate, given amount of work put to V8 to have JavaScript code executed blazingly fast.
Using latest CppTools plugin version and some spare time I was managed to patch V8 to have ability to run several V8 instances in process. I will use this codebase for demonstrating configuration / usage of the c++ plugin for mentioned pretty large task.

Thursday, February 18, 2010

New version of CppTools plugin is available!

CppTools plugin v0.7.1 for IntelliJ IDEA 6/7/8/9 is available.
Change notes:
* IDEA 9 (Maia) / Community Edition support.
* Override / implement methods action for IDEA 7/8/9.
* Quick navigate info (aka Control + mouse hover) for IDEA 7/8/9.
* Report problem with instantiation of abstract classes.
* Quick fixes: static_cast / dynamic_cast when type cast error detected.
* Bugfixes.
Install it from IDEA's plugin manager

Sunday, April 19, 2009

Starting new C/C++ project in IntelliJ IDEA

This task becomes possible in traditional IDEA style.
Prerequisites:

Steps:

  • Choose 'Create new project' action e.g. on Welcome page, select new project

  • Choose C++ module type and type module name

  • Specify C++ sdk if needed

  • Specify to create source directory

  • Specify to add entry point and build file

After that file <module name> .c or .cpp is created. In the editor live error checking and navigation work in expected way.


The project can be compiled via invoking Make (e.g. pressing Control + F9 on windows or Meta + F9 on MacOS) action.


To invoke resulting executable file one can create Cpp run configuration and its settings specify executable file path / working directory and parameters.


Tuesday, December 25, 2007

Quick start for using JaxWS 2.1 / Metro 1.X with IntelliJ IDEA 7.0.2

Creating new Web Service with IntelliJ IDEA is easy:
  1. Create new Module, on page 'Select desired technologies' check Web Application / Web Services (by default JaxWS web service will be created).
  2. After finishing project first 'HelloWorld' web service is ready for launching (Run action in popup menu :).
  3. The webservice is published with URL 'http://localhost:9000/HelloWorld'
Consuming the Web Service is just as easy:
  1. Create new Module, on page 'Select desired technologies' check Web Service Client (by default JaxWS web service client will be created).
  2. In Web service url text field in appeared dialog enter http://localhost:9000/HelloWorld?wsdl
  3. In editor live template will guide sample code for web service invokation. After finishing it the web service client is ready for running.
By default web service / web service client is created with JaxWS 2.1 bundled with IntelliJ IDEA, if newer version JaxWS stack is needed (e.g. Metro 1.X) then specify its installation path in WebServices settings.